Print your own Halloween mask.

New dotphoto home page

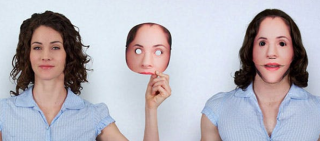
It’s fall and our thoughts turn to that important question, “What will I be for Halloween?” Here’s an idea: make your own unique, inexpensive Halloween mask by following these simple steps. The possibilities are endless.

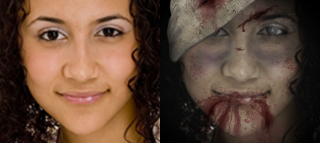
1. Take a picture you like. You might be a celebrity, your best friend, or you could run your own photo through one of two free zombiefiers here: greenish or ghoulish.

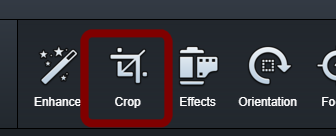
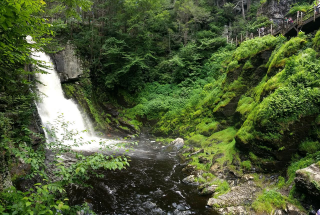
2. Design your mask. You may cut it above the mouth to leave the jaw free as in the photo above, or it could cover the mouth. Use a string to measure your face: if you intend to wrap the mask back toward your ears, the mask may be wider than it is tall, so you would print the 8×10 in landscape mode. dotphoto’s editing tool can change your cropping orientation.

3. Print the photo as an 8×10 on matte paper. Glossy paper would be reflective, so would not work as well. The mask only needs to last for a night, and 8x10s at dotphoto are only 99 cents, so you might make two or three prints of different sizes, plus a backup.

4. Cut the eye and mouth holes with an Xacto knife, and cut around the edges of the face.

5. Attach ribbons or a strap to hold the mask in place. Before cutting the strap holes on the sides of the mask, add clear tape to both sides to reinforce the holes. String and a rubber band make a good strap that can be adjusted by knotting the rubber section.

Want help setting up the photos for your mask?
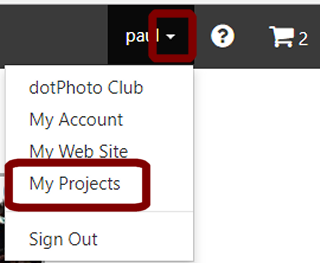
Add your photo to an album in your account called Halloween mask, and send a note to mask@dotphoto.com with your request. Please include as much information as possible — especially size.

Saving books & projects on dotphoto

New dotphoto home pageThe dotphoto My Projects tool enables you to save and retrieve projects that you’re working on. This is particularly helpful when making products with multiple photos like calendars and books, or when you want to show the product to someone else before ordering.

To retrieve a project

Choose My Projects.  dotphoto presents images of your saved projects that you can tap to return to the project design. In the illustration here, you would tap the calendar to go back to the design.

Make your own Presidential Proclamation!

Whatever your political persuasion, you can have some real fun with this web tool.

  1. Type your own text on the tablet.
  2. Use the and to enlarge or shrink the text.
  3. Click to the side to remove the blue rectangle.
  4. Capture the screen. (Ctrl-PrtScr on a PC, or Command-Shift-3 on a Mac).
  5. Paste the image into your graphics program; save the picture. Need a free desktop graphics program? Here’s a free download:
    GIMP for Mac OSX
    GIMP for Windows

The danger of relying too much on your camera

And now for something completely different…poet Wendell Berry on interposing a camera between your life and the world. We live in the time of the curated life — the finest moments buffed and shared to create an impression of a life that conforms to social standards rather than reflecting our actual lives.

We often remember the strangest moments because they are the most meaningful. Perhaps we can use our cameras to catch the most revealing, un-posed moments. A friend commented tonight that he takes multiple photos of a person because the picture “between” pictures is usually the most authentic.

The Vacation

Once there was a man who filmed his vacation.
He went flying down the river in his boat
with his video camera to his eye, making
a moving picture of the moving river
upon which his sleek boat moved swiftly
toward the end of his vacation. He showed
his vacation to his camera, which pictured it,
preserving it forever: the river, the trees,
the sky, the light, the bow of his rushing boat
behind which he stood with his camera
preserving his vacation even as he was having it
so that after he had had it he would still
have it. It would be there. With a flick
of a switch, there it would be. But he
would not be in it. He would never be in it.

How to perfectly crop a Facebook cover photo

FacebookPage2
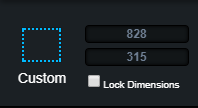
Popular web services often require images of specific sizes for use as photo headers or head shots. For instance, Facebook requires a cover photo to be 828 pixels wide by 315 pixels tall.  A Linkedin header is 1400 x 425.

Dotphoto’s editing tools will help you crop and re-size images to specific sizes, so that you can copy and paste photos for use on other web sites.  Follow these steps:

  1. Learn the optimal resolution
  2. Crop to the image you want in the dotphoto edit tools
  3. Re-size the cropped image to meet one of the two dimensions
  4. Crop the re-sized image so that the second dimension is also perfect.

Detailed steps to create a Facebook header are below. These same steps can apply to cropping any photo to any exact pixel size.

1. Learn the optimal resolution.

The dimensions for a Facebook cover photo are 828 wide x 315 tall.  (A Linkedin header is 1400 x 425.)

2. Crop to the image you want in the dotphoto edit tools.

Click on the photo, and then on the edit icon (the pencil) in the upper left to show the editing tools.

Choose the Cropping tools from the edit menu.

Use the Custom size to crop the best part of the photo. In the image below, we cropping out the wrapped pole on the left and leaving the subjects — the carousel animals — in the center of the image. Drag the corners of the cropping rectangle, and, when you have finished, tap the Apply button. Leave plenty of vertical space around your subject: a Facebook cover photo is a wide, short image, and we’ll crop the extra vertical space in step 4.

3. Re-size the cropped image to meet one of the two dimensions. Set the width to 840.

Choose the Resize tool on the right sight of the cropping menu. If you don’t see Resize, scroll the menu to the right.

Set the width to 828, which is the perfect width for a Facebook cover photo. Tap the Apply button on the right. We will crop the height in the next step.

4. Crop the re-sized image so that the second dimension is also perfect. Set the height to 315.

Set the Custom Dimensions to 828 x 315. You’ll have a cropping rectangle that is as wide as your image, and that you can drag up and down to capture the optimal cover photo. When you’re ready, tap the Apply button.

Tap the Save button on the right and Save as a New Image. This will NOT overwrite your original photo.

Go back to the new photo, right-click on it, and choose Copy image.

In Facebook, start a post, and paste the photo into your Facebook post. (Ctrl-V, or Right-click / Paste ) This will add the photo to your Facebook photos so that you can choose it for your Cover Photo.

In your Facebook account, hover over the Update Cover Photo in the upper left corner, and select Choose From My Photos.

Find the new Cover Photo that you just made among your Facebook photos, and choose Save Changes.

You have made a perfectly-sized Facebook Cover Photo.

How to Get Free Starbucks Refills

Money-Saving Tip
Last week, I ordered another drink at Starbucks in my existing cup, and the barista said something I never expected to hear: “That will be 53 cents.” Later, I learned that, if you buy the original drink with your Starbucks card, your refill is free. (Some say Starbucks drinks taste even better in dotphoto customized mugs.) Here are the official rules for free refills.

Mother-Daughter Wedding Mug 15 oz

Only $13.72 including Club shipping
No additional charge for multiple photos

Compare at $19.99 plus $5 shipping on other sites

When I discovered baby and wedding photos of my wife with her mother, I thought it would be fun to put them on the same mug. My wife was delighted with this mug, and, for the record, my mother-in-law has not changed a bit.

How to Convert RAW files to JPG files for Uploading

dotphoto accepts up to 20MB files at 6000 dots along the longest side (up to 36 megapixels.) That is a very large file and appropriate for printing and displaying virtually anywhere. dotphoto accepts most popular photo formats, but not RAW files, which are used mainly for editing by professional photographers.

Here are two ways to convert from RAW to JPG so that you can upload your photos to dotphoto:

  1. Online RAW conversion tool:  https://raw.pics.io/
    Raw.pics.io is an in-browser RAW files viewer and converter.
  2. Download Irfranview software to batch-convert files on your PC.

Download the free editing program, Irfanview.  This sophisticated editing program also offers a powerful bulk conversion routine.

Run Irfranview, and press on your keyboard.  You will see a Batch conversion screen like the one below.

  1. Make sure you’re in Batch conversion
  2. Set the Output format to JPG.
  3. Choose your Output directory, so you can find the files when you’re finished!
  4. Add the files you want to convert. You will not lose the old files; you are creating new ones. We recommend that you run a small test first to make sure everything is set up correctly. (In the example below, the files being converted are PNG, but you can convert many kinds of files including RAW.)
  5. Tap the Start button to run the conversion.

8 Sources Of Free Stock Photos For Your Walls – Or Any Use At All!

Sometimes, you may want unique professional photos to decorate a wall, illustrate a brochure, or make a meme.

These 8 web sites provide thousands of free high-quality photos that are licensed for both personal or commercial uses.

New dotphoto home page1. Wunderstock says it’s the easiest way to find free stock images.


2.  Free stock photos  Use them any way you want.

3. StockSnap All photos on StockSnap fall under the Creative Commons CC0 license. That means you can copy, modify, distribute any photo on the site, even for commercial purposes, all without asking permission!

4. Foodiesfeed is a resource of awesome naturally looking food photos that are completely free to download. These oranges would brighten up any kitchen.


5. Free sports photos  Unsplash has over 200,000 free (do whatever you want) high-resolution photos brought to you by the world’s most generous community of photographers.

6. Free Business Images All Burst images are free for personal and commercial use.


7. Free Vintage stock photos  You can do nearly anything with the images, commercial or not.


8. Negative Space  Beautiful, free high-resolution photos with no restrictions.  For personal or commercial projects, all of our CC0 licensed images are completely free to use!

You can find these stock photo sources in the future by searching dotphoto’s FAQs for this link.

How to capture digital videos and photos from VHS tapes

Recently, I wanted to get photos of my cousin from old home movies, and to digitally capture and edit an historic VHS tape of an interview with the co-pilot of the Bock’s Car.

You can capture photos and digital videos from VHS with a handy product called VidBox, available from BestBuy ($60) in both Mac or Windows versions. As seen here, VidBox connects to your old VHS’ RCA jacks and to your computer’s USB port. VidBox includes software to capture the video as it’s played, and you get a nice digital file to edit.

For editing, I used CyberlinkPowerDirector and PhotoDirector.  (About $99 in a bundle.) PowerDirector makes it relatively easy to add photos, music, and video clips to create interesting videos, and PhotoDirector lets you capture photos from video, as well as re-touch and create sophisticated effects.
The oldest images were originally shot on 8mm and transferred to VHS by videotaping a screen. Direct-to-VHS yielded better results, but both gave me the feeling that I was reaching back into history to capture some wonderful, evocative photos that had been – until now – lost to time.

Turn your videos into books
Video images are smaller than the high-resolution cameras we use today, but, once you’ve captured photos from video, it’s an easy step to upload them to dotphoto and auto-populate a beautiful dotphoto book.  Video: How to make a dotphoto booK and get $49 off

The strange and curious future of photography

This blog is devoted to a trend in camera development, and to related features that are in your phone today.
Cameras are moving from capturing photos to gathering light, and the trend is accelerating. Lenses are going away, and cameras themselves may also disappear as light-gathering devices become so small and ubiquitous that you will be able to call up images from virtually anywhere – and then focus, crop, zoom, and edit as you like.

We’re getting a taste of that in the evening news: when a crime occurs, images are gathered from security cameras in the area. Cameras now in development are so small and inexpensive that they may be built into your watch, glasses, clothing or anything you commonly carry – and they may be everywhere. You may ask dotphototo sort through the best images that you automatically gathered that day, or ask your theme park to track your location so their cameras can serve up a photo album for you to refine after your visit.

Zoom in later.
The difference for photographers is that the emphasis will go from taking a picture in the moment to taking a picture afterward. This happens even today. For instance, many camera phones have such high resolution that you can crop out one player on a baseball field to create the player’s portrait. We recently helped a dotphotocustomer do just that with the dotphoto editor. How to crop with the dotphoto editor

Panoramas are light-gatherers.
If you take panoramic photos, your camera is acting as a light-gathering device: as you scan across an area, the software stitches together the image. You can edit the panorama afterward to produce the best possible shot.

Ratios won’t matter.
We think in terms of 4×6, 5×7 and 8x10s because it’s cheap to mass produce prints and frames in standard sizes. However, the move to digital from film frees photographers from ratios. Dotphoto provides custom-sized prints, laminated prints, posters, and frames for panoramas and virtually any shape through our custom framing shop.  Click here for more on printing custom sizes.

Ultra-thin, tiny, lense-free cameras
Lens-free camera on a pennyThat bump on your camera phone is too fat for a scientist at Caltech who has already miniaturized amplifiers for phones, put radar on a chip for self-driving cars, and designed an electromagnetic medical chip. His Optical Phased-Array (OPA) receiver collects light for processing later. Focus in or out, zoom, crop, and establish your picture later. One company, Lytro, already provides niche light-gathering cameras, but the OPA demonstrates that light-gathering technology can change photography dramatically.

New Sharing Options at dotPhoto

The wonderful thing about sharing your photos from dotPhoto is that you have one place where you can upload, organize and edit your photos, and – after creating the story you want to tell – you can share your photos as you like – through email, Facebook, Twitter, Google Plus, Pinterest, discussion boards, and many other sharing services. dotPhoto will send your albums, slideshows or individual images wherever on the web that you meet your friends.
Photo sharing may be the only place where you can have your cake and eat it, too. When we share our photos, people are a little bit happier, and so are we.

dotPhoto has improved our sharing capabilities lately, so we’ve made this 3-minute video to explain how to use dotPhoto’s sharing resources.

How to make a Meme at dotPhoto

Memes are photos with a few pointed words that sometimes become viral postings in social media.

dotPhoto’s editing program lets you make your own memes with your photos like the ones here. Just click on a photo, choose the pencil icon in the upper left, and choose the meme tool.

More info on making and sharing memes

Making and sharing memes is part of the dotPhoto Club Plan.

NEW dotPhoto Mail-for-Me Cards

Here’s another dotPhoto Club benefit: 5x7 Mail for Me Cards for only $1.99

You can create, sign, seal, stamp and send a customized 5×7 photo card without leaving your desk for only $1.99 for Club Members. That’s $1.79 LESS than the average card-store card with first class stamp.*

Customize your dotPhoto card with:

  • Photos inside and out
  • Caption on front
  • Large text box inside
  • Signature box below the text box

Make your own card and send a unique, genuine message for significantly less than the cost of a card-store card.

In the Shop, type Mail to find Mail for Me cards, and use the All Occasions designs.

Colorize your black-and-white photos!

Color brings to life older black-and-white photos. The best reason to colorize may be that young people don’t like to look at anything that is not color. I want my children to have a few nice color photos of their grandparents.

Colorization was once a difficult art, but you can now colorize a photo by choosing a color from an existing image and “painting” it over the region of the black-and-white photo. Here is a photo of Pearl S. Buck, the first  American woman to win the Nobel prize for literature.

In the example here, we borrowed lip color from a color portrait of Mrs. Buck, and found a model on the web to lend auburn hair color. We also tried an automatic colorization app, but it generated too much red tint for our taste. Try ColorizePhoto.com here

When you’re finished, you can download your colorized image, and print it on dotPhoto.